
Kotlin and WebAssembly
This article is paired with a companion repository. Get your free code while it is fresh.
Why WebAssembly is Relevant?
For a long answer to this question read our introduction on WebAssembly: Why should you care?
The short answer is that WebAssembly can permit to compile seriously complex application into an efficient binary format, that can be run in web browsers with good performance.
So far we had just JavaScript, now we have an assembly for the web and we can compile all sort of languages to WebAssembly (WASM for its friends). Think of C, C++, Rust, and… Kotlin, obviously. All compilable to WASM.
WASM Support in Browsers
At the time of writing 71% of browsers support WASM. Edge, Firefox, Chrome, Safari: they all support WASM. People on IE or weird mobile browsers are left out in the cold but every desktop users who bothered to get its browser from this century has support for WASM.
In some browsers WASM could be supported but be disabled by default. On recent Chrome and Firefox it should be enabled by default.
It is time to get ready for WASM. Or do you want to left behind to play with Cobol & Fortran?
The Current Status of Kotlin Support for WASM
Update from November 2023: This target was removed in Kotlin 1.9.20 in favour of a dedicated Kotlin/Wasm platform. You can keep yourself up-to-date about Kotlin and Wasm on the official website of the project. We keep this article unchanged for people using previous versions of Kotlin.
The first thing we should notice is that Kotlin supports WASM through its Kotlin/Native compiler. The Kotlin/Native compiler is based on LLVM and LLVM supports WebAssembly, ergo we can get WASM files from Kotlin source code.
Great, however that is not all we need. We need far more things to be productive when writing Kotlin to be compiled to WASM and things are very rough around the edges at the moment. We need great support and we are getting there but so far when compiling to WASM things are more difficult than when we compile Kotlin for the JVM or to JavaScript. You like living on the edge and take a look at the future? Cool, but do not expect first class service while doing so.
How to Run the Kotlin Native Compiler from the Command Line
You will need to run Kotlin Native compiler from the command line in two cases:
- If you do not want to build your project using Gradle and the Konan plugin
- If you want to compile the libraries using jsinterop (but you can find them precompiled in the companion repository)
Anyway, if you still want to be able to call the compiler directly this is what you need to do.
First of all you need to download the Kotlin/Native binaries. You can find them here.
Once you have downloaded the binaries you unpack them and you add the binaries to the PATH. Yes, pretty old style, but that still works. Perhaps you can write your own little script to do that:
#!/usr/bin/env bash
KOTLIN_NATIVE_HOME=/Users/federico/tools/kotlin-native-macos-0.6.2
export PATH=$KOTLIN_NATIVE_HOME/bin:$PATH
Now we can move to see how things work when using Gradle.
How to Build Your Kotlin WASM Project Using Gradle
That is pretty simple. This is all you need is to type this code into your build.gradle file:
buildscript {
    repositories {
        jcenter()
        maven { url "http://kotlin.bintray.com/kotlinx" }
        maven { url "https://plugins.gradle.org/m2/" }
        maven { url "https://dl.bintray.com/jetbrains/kotlin-native-dependencies" }
    }
    dependencies {
        classpath "org.jetbrains.kotlin:kotlin-gradle-plugin:$kotlin_version"
        classpath "com.moowork.gradle:gradle-node-plugin:$gradle_node_version"
        classpath "org.jetbrains.kotlin:kotlin-native-gradle-plugin:$kotlin_native_version"
    }
}

apply plugin: 'konan'

konanArtifacts {

    program('stats', targets: ['wasm32']) {
         srcDir 'src/main/kotlin'
         libraries {
             useRepo 'lib'
             klib 'dom'
         }
    }
}
At this point you can just use the build target and you are good to go.
Well, almost, you still need the DOM library.
The DOM Library
Currently there are two libraries you may want to use with WASM. You can build them using the jsinterop tool which is distributed with Kotlin Native.

Let’s try it:
Ok, this is not really super flexible, is it?
It seems that there are two libraries supported when running Kotlin and WASM. So what you can do is build those two libraries and forget about the jsinterop tool. To save time I just built the dom and math libraries and added to the lib directory of the repository.
Ok, now we can really get started, we have just to fire our IDE, right?
Well, yes, there is something I have to tell you…
The IDE Issue
Currently there is an IDE with support for Kotlin/Native, ergo one IDE with support for writing Kotlin applications which compile to WebAssembly. That IDE is CLion, from Jetbrains and… it is not available for free.
So, it is an issue? Yes, it is… but it is not as bad as you think.
First of all many of us are professionals that work in companies making money out of software, so it should not be a taboo to pay for some tools. Should it be? Still, I understand that it is a problem for all the kids out there that are learning and cannot afford paying for a license. Well, there are two things to consider.
1 – Life outside an IDE is possible

You can just use IntelliJ IDEA to get Kotlin syntax highlighting but IDEA will not understand the WASM libraries and it will not know how to compile to wasm, so you will have to do that from the command line. Basically you will be using IntelliJ IDEA as it was an humble editor, not a full IDE.
2 – The free IDE seems to be coming
So, do not stress too much about the IDE. Great things are going to happen if you keep your heart pure and you keep wishing for it real hard. In the meantime, let’s program as our fathers used to do. Or as the weird guy still using vim is doing.
Our Example
Our example is based on the application used by Jetbrains at the first KotlinConf.
This application reads some data on votes and update constantly a graph to show the distribution of votes between five teams.
It looks like this:

Ok, how can we build this thing?
File src/main/kotlin/main.kt
Let’s start with the main:
import kotlinx.interop.wasm.dom.*
import kotlinx.wasm.jsinterop.*

fun loop(canvas: Canvas) {
    fetch("/stats.json").
            then { args: ArrayList ->
                val response = Response(args[0])
                response.json()
            }.
            then { args: ArrayList ->
                val json = args[0]
                val colors = JsArray(json.getProperty("colors"))
                assert(colors.size == Model.tupleSize)

                val tuple = arrayOf(0, 0, 0, 0, 0)
                for (i in 0 until colors.size) {
                    val color = colors[i].getInt("color")
                    val counter = colors[i].getInt("counter")
                    tuple[color - 1] = counter
                }
                Model.push(tuple)
            }.
            then { View(canvas).render() }
}

fun main(args: Array<String>) {
    val canvas = document.getElementById("myCanvas").asCanvas
    setInterval(100) {
        loop(canvas)
    }
}
So the main basically find the canvas element in the DOM, then it starts an infinite loop. In this loop every 100ms the loop function is called.
What the loop function does?
- retrieve data from stats.json,
- take that data and push them into the Model,
- then it ask the view to update itself to show the new data.
File src/main/kotlin/model.kt
So now we can take a look at the model. Note that this is an object, not a class. That means we have just one instance of Model and the rest of the system (most importantly the View) can access it without the need of a reference.
object Model {
    val tupleSize = 5
    val styles = Style.styles

    val backLogSize = 100
    private val backLog = IntArray(backLogSize * tupleSize, {0})
    private fun offset(time: Int, color: Int) = time * tupleSize + color

    var current = 0
    var maximal = 0

    fun colors(time: Int, color: Int): Int = backLog[offset(time, color)]

    fun tuple(time: Int) = backLog.slice(time * tupleSize .. (time + 1) * tupleSize - 1)

    fun push(new: Array<Int>) {
        assert(new.size == tupleSize)

        new.forEachIndexed { index, it ->
            backLog[offset(current, index)] = it
        }
        current = (current+1) % backLogSize

        new.forEach {
            if (it > maximal) maximal = it
        }
    }
}
What the model does?
The model simply receive an array of data (one value for each “team”) and add it to its backlog. The backlog it is basically an array of 500 values, or in other words the last 100 entries of 5 values each.
Initially it is set to contain just zeros but over time it start to be filled with the actual values received through push.
File src/main/kotlin/view.kt
Wonderful, now that we have data it is time to show that data.
In the view file we have one object and two classes:
Stylecontains some constants about colorsLayoutcontains constants about the positions of elements, the padding, sizes, etcViewis where the funny stuff happens
Basically in View we draw the data and update the labels. The most external labels indicates just the IDs of the teams: a number from 1 to 5. The more internal labels instead indicates the most recent values for each team.
import kotlinx.interop.wasm.dom.*
import kotlinx.wasm.jsinterop.*

object Style {
    val backgroundColor = "#16103f"
    val teamNumberColor = "#38335b"
    val fontColor = "#000000"
    val styles = arrayOf("#ff7616", "#f72e2e", "#7a6aea", "#4bb8f6", "#ffffff")
}

open class Layout(val rect: DOMRect)  {
    val lowerAxisLegend = 0.1
    val fieldPartHeight = 1.0 - lowerAxisLegend

    val teamNumber = 0.10
    val result = 0.20
    val fieldPartWidth = 1.0 - teamNumber - result

    val teamBackground = 0.05

    val legendPad = 50
    val teamPad = 50
    val resultPad = 40

    val teamRect = 50

    val rectLeft = rect.getInt("left")
    val rectTop = rect.getInt("top")
    val rectRight = rect.getInt("right")
    val rectBottom = rect.getInt("bottom")
    val rectWidth = rectRight - rectLeft
    val rectHeight = rectBottom - rectTop

    val fieldWidth: Int = (rectWidth.toFloat() * fieldPartWidth).toInt()
    val fieldHeight: Int = (rectHeight.toFloat() * fieldPartHeight).toInt()

    val teamWidth = (rectWidth.toFloat() * teamNumber).toInt()
    val teamOffsetX = fieldWidth
    val teamHeight = fieldHeight

    val resultWidth = (rectWidth.toFloat() * result).toInt()
    val resultOffsetX = fieldWidth + teamWidth
    val resultHeight = fieldHeight

    val legendWidth = fieldWidth
    val legendHeight = (rectWidth.toFloat() * lowerAxisLegend)
    val legendOffsetY = fieldHeight
}

class View(canvas: Canvas): Layout(canvas.getBoundingClientRect()) {
    val context = canvas.getContext("2d");

    fun poly(x1: Int, y11: Int, y12: Int, x2: Int, y21: Int, y22: Int, style: String) = with(context) {
        beginPath()
        lineWidth = 2; // In pixels
        setter("strokeStyle", style)
        setter("fillStyle", style)

        moveTo(x1, fieldHeight - y11)
        lineTo(x1, fieldHeight - y12)
        lineTo(x2, fieldHeight - y22)
        lineTo(x2, fieldHeight - y21)
        lineTo(x1, fieldHeight - y11)

        fill()

        closePath()
        stroke()
    }

    fun showValue(index: Int, value: Int, color: String) = with(context) {
        val textCellHeight = teamHeight / Model.tupleSize
        val textBaseline = index * textCellHeight + textCellHeight / 2

        // The team number rectangle
        fillStyle = Style.teamNumberColor
        fillRect(teamOffsetX + teamPad,  teamHeight - textBaseline - teamRect/2, teamRect, teamRect)

        // The team number rectangle
        fillStyle = color
        fillRect(resultOffsetX,  teamHeight - textBaseline - teamRect/2, teamRect/2, teamRect)
    }

    fun showText(index: Int, value: Int, color: String) = with(context) {
        val textCellHeight = teamHeight / Model.tupleSize
        val textBaseline = index * textCellHeight + textCellHeight / 2

        // The team number in the rectangle
        setter("font", "16px monospace")
        setter("textAlign", "center")
        setter("textBaseline", "middle")
        fillStyle = Style.fontColor
        fillText("${index + 1}", teamOffsetX + teamPad + teamRect/2,  teamHeight - textBaseline, teamWidth)

        // The score
        setter("textAlign", "right")
        fillStyle = Style.fontColor
        fillText("$value", resultOffsetX + resultWidth -  resultPad,  resultHeight - textBaseline,  resultWidth)
    }

    fun showLegend() = with(context){
        setter("font", "16px monospace")
        setter("textAlign", "left")
        setter("textBaseline", "top")
        fillStyle = Style.fontColor

        fillText("-10 sec", legendPad, legendOffsetY + legendPad, legendWidth)
        setter("textAlign", "right")
        fillText("now", legendWidth - legendPad, legendOffsetY + legendPad, legendWidth)
    }

    fun scaleX(x: Int): Int {
        return x * fieldWidth / (Model.backLogSize - 2)
    }

    fun scaleY(y: Float): Int {
        return (y * fieldHeight).toInt()
    }

    fun clean() {
        context.fillStyle = Style.backgroundColor
        context.fillRect(0, 0, rectWidth, rectHeight)
    }

    fun render() {
        clean()
        // we take one less, so that there is no jump from the last to zeroth.
        for (t in 0 until Model.backLogSize - 2) {
            val index = (Model.current + t) % (Model.backLogSize - 1)

            val oldTotal = Model.tuple(index).sum()
            val newTotal = Model.tuple(index + 1).sum()

            if (oldTotal == 0 || newTotal == 0) continue // so that we don't divide by zero

            var oldHeight = 0;
            var newHeight = 0;

            for (i in 0 until Model.tupleSize) {
                val style = Model.styles[i]

                val oldValue = Model.colors(index, i)
                val newValue = Model.colors(index+1, i)

                val x1 = scaleX(t)
                val x2 = scaleX(t+1)

                val y11 = scaleY(oldHeight.toFloat() / oldTotal.toFloat())
                val y21 = scaleY(newHeight.toFloat() / newTotal.toFloat())

                val y12 = scaleY((oldHeight + oldValue).toFloat() / oldTotal.toFloat())
                val y22 = scaleY((newHeight + newValue).toFloat() / newTotal.toFloat())

                poly(x1, y11, y12, x2, y21, y22, style);

                oldHeight += oldValue
                newHeight += newValue
            }
        }
        for (i in 0 until Model.tupleSize) {
            val value = Model.colors((Model.current + Model.backLogSize - 1) % Model.backLogSize, i)
            showValue(i, value, Model.styles[i])
        }
        for (i in 0 until Model.tupleSize) {
            val value = Model.colors((Model.current + Model.backLogSize - 1) % Model.backLogSize, i)
            showText(i, value, Model.styles[i])
        }

        showLegend()
    }
}
We have the code but now how can we use it?
We are going to see that in the next paragraph.
Putting Pieces Together
We will need to package our web application. We will need:
- A way to get the data to display
- An HTML page
- The wasm file with the compiled code
- A JS file to launch the wasm code
To keep things easy we will get the data directly from a simple JSON file. Of course in a real application you may want a data-source a bit more dynamic…
This is our glorious stats.js:
{
  "colors" : [
    {
      "color": 1,
      "counter": 4
    },
    {
      "color": 2,
      "counter": 14
    },
    {
      "color": 3,
      "counter": 9
    },
    {
      "color": 4,
      "counter": 7
    },
    {
      "color": 5,
      "counter": 6
    }
  ]
}
The HTML page will be actually quite simple, as it will contain just a canvas and the code to load our script:
<!DOCTYPE html>
<html lang="en">
  <head>
    <meta charset="UTF-8">
    <meta name="viewport" content="width=device-width, initial-scale=1.0">
    <meta http-equiv="X-UA-Compatible" content="ie=edge">
    <title>WASM with Kotlin</title>
    <style>
      html, body {
        width:  100%;
        height: 100%;
        margin: 0px;
      }
    </style>
  </head>
  <body>
    <canvas id="myCanvas">
  </canvas>
    <script wasm="./stats.wasm" src="./stats.wasm.js"></script>
  </body>
</html>
Finally there are the stats.wasm and stats.wasm.js. We get them just by running `./gradlew build`. But that is not enough, we also need to put those files in the directory that we are going to serve through http. So what we do is simply copying the wasm and wasm.js files from build/konan/bin/wasm32/ to web.
Now we have all that we need, we just need to get all the pieces to the browser. How are we going to do that? Using a very simple http server.
Serving Files Using the simplehttp2server
During development I prefer to use a simple solution, named simplehttp2server. You are surely a smart reader, able to figure out how to install it on your platform or find a valid alternative.
For example on mac you can simply run:
brew tap GoogleChrome/simplehttp2server https://github.com/GoogleChrome/simplehttp2server
brew install simplehttp2server
Once you have installed all that you have to do is to go into your web directory and run simplehttp2server. The directory at this point should contain the html file, the wasm file, the wasm.js file, and the json file.
Now you can visit http://localhost:5000 and you should see the application:
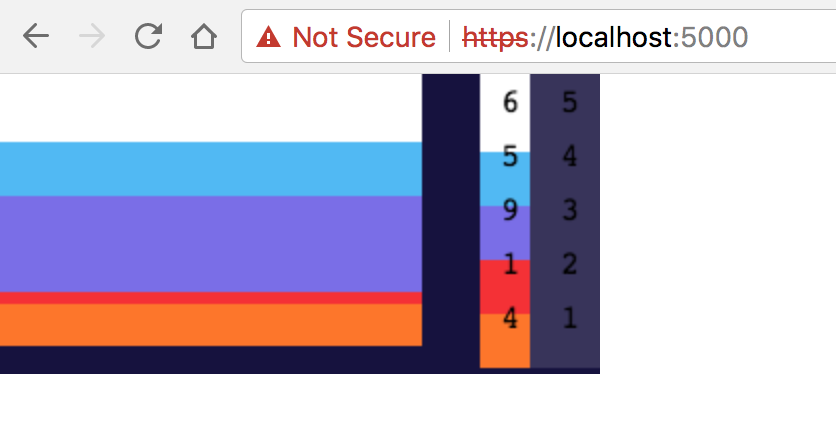
Ok, nothing is going on but if you open the stats.json file and change it you should see the image change.
Call JavaScript Functions from WASM
Well, JavaScript interoperability is improvable. Basically the wrapper generated by the compiler exposes to the WASM file some symbols. The problem is that apparently at this moment there is no proper way to add more symbols to that list.
Suppose we want to add a function to show an alert once we got data. We modify our model file like this:
object Model {
    val tupleSize = 5
    val styles = Style.styles

    val backLogSize = 100
    private val backLog = IntArray(backLogSize * tupleSize, {0})
    private fun offset(time: Int, color: Int) = time * tupleSize + color

    var current = 0
    var maximal = 0

    fun colors(time: Int, color: Int): Int = backLog[offset(time, color)]

    fun tuple(time: Int) = backLog.slice(time * tupleSize .. (time + 1) * tupleSize - 1)

    fun push(new: Array<Int>) {
        igotdata()
        assert(new.size == tupleSize)

        new.forEachIndexed { index, it ->
            backLog[offset(current, index)] = it
        }
        current = (current+1) % backLogSize

        new.forEach {
            if (it > maximal) maximal = it
        }
    }
}

@SymbolName("imported_igotdata")
external public fun igotdata()
Ok, but how can I expose a JS function to the Kotlin code?
No, there is no proper way but there is an hack you could use :
- Make the loading fail on purpose, after the loader has created some structures
- Insert in those structures some extra symbols
- Run the WASM file
For point one we can simply remove the wasm attribute from the script tag:
<script src="./stats.wasm.js"></script>
Now, if you try to load the page you get an error:

At this point let’s inject the symbol `imported_igotdata` and run the webassembly.
<script>
        konan.libraries.push({"imported_igotdata":function(msg){ alert("I got the data, updating");}})
        var filename = "./stats.wasm";
        fetch(filename).then( function(response) {
            return response.arrayBuffer();
        }).then(function(arraybuffer) {
            instantiateAndRun(arraybuffer, [filename]);
        });
</script>
I suggest you to slow down the loop from 100ms to 1000ms before trying this code….
Call WASM Functions from JavaScript
To do that we can use the WebAssembly object to compile an entire script and run them or run single functions. However this is nothing specific to Kotlin.
Summary
And this is it: a first example of a Kotlin application compiled to WASM.
Now, this is of course very raw and primitive. There are clearly issues:
- Limited standard library available
- The only IDE is not free
But things move fast in the Kotlin world.
We have already support for multiplatform projects. That means that we can build as of today libraries that can be used on the JVM, in the JavaScript world and compiled to wasm.
A free IDE is coming. The Kotlin/Native compiler is progressing at a fast pace.
Things are going to be soon very interesting and we suggest you get ready and start being aware of what this new world looks like.


Leave a Reply
Want to join the discussion?Feel free to contribute!