Compile Kotlin to native executables: hands on experience
Kotlin is becoming the one language you can use in every context:
- it can be compiled to JVM bytecode and reuse JVM libraries
- it can be transpiled to JavaScript and use JavaScript libraries
- it can now also be compiled to native code reusing native libraries
While the JVM and JavaScript target are already mature, the native target is more recent and it is still experimental. However we decided to take a look and check ourselves what is already possible to do.
We are working with version 0.3 which supports:
- Mac OS X 10.11 and later (x86-64), host and target
- Ubuntu Linux x86-64 (14.04, 16.04 and later), host and target
- Microsoft Windows x86-64 (tested on Windows 7 and Windows 10), host and target
- Apple iOS (arm64), cross-compiled on MacOS X host
- Android arm32 and arm64,cross-compiled on Linux or MacOS X host
- Raspberry Pi, cross-compiled on Linux host
In other words you can target all the 3 main OS for the Desktop, the 2 main OS for mobile, and Raspberry Pi.

What we are going to do
Our goal is to check in practice how we can use Kotlin native today. We are going to build a simple application using a C library (libpng).
We are going to build an application that generates a simple image: the Kotlin logo. Our program will take as input the desired size of the image and generate the logo. The logo will be saved in PNG format, and that is why we need to use libpng.
We are going to see:
- How to configure the project using a specific gradle plugin
- How to build the Kotlin library manually
- How to launch the compiler manually
- How to write the code
Setup the project using the kotlin native gradle plugin
The simplest way to build a project using Kotlin native is to use gradle as your build system and the corresponding plugin.
To get started you need to:
- create gradle.properties
- create build.gradle
- create the src/main/kotlin directory for your Kotlin source code
- typically you want also to run
gradle wrapper. Basically it creates a little script that install gradle if needed. Read more here.
Let’s see what we need to insert in those you files.
gradle.properties
konan.version=0.3
We specify just the version of the kotlin native compiler we want to use.
build.gradle
buildscript {
    repositories {
       mavenCentral()
       maven {
           url  "https://dl.bintray.com/jetbrains/kotlin-native-dependencies"
       }
   }

   dependencies {
       classpath "org.jetbrains.kotlin:kotlin-native-gradle-plugin:0.3"
   }
}

apply plugin: 'konan'
apply plugin: 'idea'

konanArtifacts {
    LogoGenMacbook {
        target "macbook"
    }
}
In this case the gradle script contains also the IDEA plugin so that we can generate an IDEA project by running ./gradlew idea.
We have then defined a target to build the executable for macos. You could want to pick another target. Valid targets currently are:
- android_arm32
- android_arm64
- iphone
- iphone_sim
- macbook (for macOS)
- mingw (for Windows)
- linux
Hello world from native
src/main/kotlin/logogen.kt
fun main(args: Array<String>) {
   println("Hello from native!")
}
At this point we can compile everything with ./gradlew build. Then we can just run ./build/konan/bin/LogoGenMacbook.kexe to execute it and voila!

Using native libraries
While printing on the screen can be exciting at first after a while we could want to move forward. For doing anything meaningful we are going to need some native library. In this example we are going to use libpng, but the same procedure applies to use any library.
Note that you can reuse all native libraries that follows the C ABI. For other languages like C++ or Rust you could have to wrap the libraries with C before being able to use them, or use existing C bindings, where available.
Install native library
First of all we could want to install the library on our system. This is technically not needed: we could just download it somewhere and specify the include directory and the linker options.
On mac I ran:
brew install libpng
Define def files
Now we need to make Kotlin code aware of the C functions we want to use from libpng. To do that we just list the header files we want to use.
src/main/c_interop/png.def
headers = /usr/local/include/png.h stdio.h stdlib.h string.h math.h
You could notice that we included both headers from libpng and others from the standard library. Now, we could be tempted to define another def file for the standard library but that did not work for me. Why? Because when importing png.h the compiler also imports all files included by png.h, including some from the standard library. For the corresponding structures (like FILE), it creates a Kotlin wrapper. So we end up with two different FILE: one from the standard library and one for png, that was imported implicitly. This cause all sort of compilation errors, so let’s make our life easier. This is something that will need to be sorted out eventually, but for now let’s use a workaround and define one def file with everything we need.
Add linking instructions
We need also to update build.gradle to use our library:
// This is new
konanInterop {
   png {
       defFile 'src/main/c_interop/png.def'
   }
}

konanArtifacts {
    LogoGenMacbook {
        linkerOpts "-L/usr/local/lib -lpng" // we added this line
        target "macbook"
        useInterop 'png' // and this one
    }
}
Import
Now we need to import the C functions and structures in our Kotlin file. We do this with this line:
import png.*
And that is it, we are now ready to use libpng from Kotlin!
What our application will do: logos, logos of all sizes!
Our application is going to generate the Kotlin logo of the size we want.
You can download the Kotlin logo from the official website but our program will instead generate it programmatically and save it to a PNG image.
Let’s draw our first image
Let’s start with a first version that will generate a logo of 500×500 pixels. It will generate the logo using three bands of homegenous color. We will add the nice gradient of the real logo in a successive iteration.
import kotlinx.cinterop.*
import png.*

val PNG_LIBPNG_VER_STRING = "1.6.29"
val PNG_INTERLACE_NONE = 0
val PNG_COMPRESSION_TYPE_BASE = 0
val PNG_FILTER_TYPE_BASE = 0

data class Color(val r: Int, val g: Int, val b: Int)

val ORANGE = Color(244, 133, 25)
val BLUE = Color(39, 137, 217)
val WHITE = Color(255, 255, 255)

fun setRGB(rowBuffer: CPointer<ByteVar>, y: Int, x: Int, color: Color) {
     rowBuffer.plus(3 * x + 0)!!.reinterpret<ShortVar>(()[0] = color.r.toShort()
     rowBuffer.plus(3 * x + 1)!!.reinterpret<ShortVar>(()[0] = color.g.toShort()
     rowBuffer.plus(3 * x + 2)!!.reinterpret<ShortVar>(t()[0] = color.b.toShort()
}

fun draw_logo(width: Int, height: Int, filename: String) {
   val fp = fopen(filename, "wb")
   if (fp == null) {
      println("Unable to open the file")
      return
   }

   val png_ptr = png_create_write_struct(PNG_LIBPNG_VER_STRING, null, null, null)
   if (png_ptr == null) {
      println("Unable to create the png (png_create_write_struct failure)")
      return
   }

   val info_ptr = png_create_info_struct(png_ptr)
   if (info_ptr == null) {
      println("Unable to create the png (png_create_info_struct failure")
      return
   }

   png_init_io(png_ptr as CPointer<png_struct>, fp)

   val bit_depth = 8
   val color_type = PNG_COLOR_TYPE_RGB

   png_set_IHDR(png_ptr, info_ptr, width, height,
         bit_depth, color_type, PNG_INTERLACE_NONE,
         PNG_COMPRESSION_TYPE_BASE, PNG_FILTER_TYPE_BASE)

   png_write_info(png_ptr, info_ptr)

   val rowBuffer = nativeHeap.allocArray<ByteVar>(3 * width + 3)
   for (y in 0..(height-1)) {
      val yProp = (y+1).toFloat()/height
      for (x in 0..(width-1)) {
         val xProp = (x+1).toFloat()/width
         val topBand = yProp <= 0.5 && xProp <= (0.5 - yProp)
         val middleBand = !topBand && xProp <= (1.0 - yProp)
         val lowerBand = yProp >= 0.5 && ((xProp <= 0.5 && xProp>= (1.0-yProp)) || (xProp>=0.5 && xProp <= yProp))
         if (topBand || lowerBand) {
            setRGB(rowBuffer, y, x, BLUE)
         } else if (middleBand) {
            setRGB(rowBuffer, y, x, ORANGE)
         } else {
            setRGB(rowBuffer, y, x, WHITE)
         }
      }
      png_write_row(png_ptr, rowBuffer)
   }

   png_write_end(png_ptr, null)

   fclose(fp)
   println("Logo of size $width x $height generated in $filename")
}

fun main(args: Array<String>) {
   draw_logo(500, 500, "logo.png")
}
We have a bunch of calls to libpng functions. You can look at the documentation of that library if you are interested in details, we will mostly comment the Kotlin stuff.
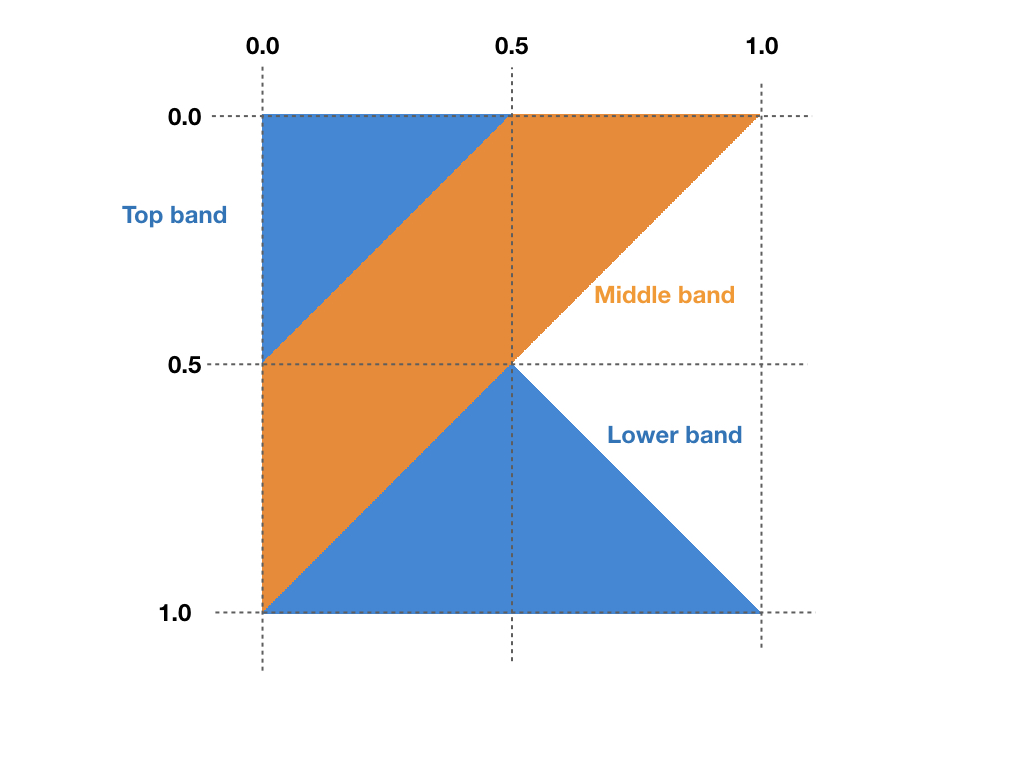
Our main contains just a call to draw_logo. This function is where we create a PNG and save it to file. Most of the code is just boilerplate. The interesting part is composed by the two annidated loops over the height and the width of the image. Basically for each pixel we want to calculate its proportional position (xProp, yProp). These are values from 0 and 1, where 0 for the xProp indicates the left, 1 indicates the right and 0.5 indicates the middle. Similarly for yProp 0 indicates the top, 1 the bottom and 0.5 the middle. For each pixel we want to understand in which band it belongs. Take a look at this picture:

You can compare the picture with the expressions to calculate to which band a pixel belong:
val topBand = yProp <= 0.5 && xProp <= (0.5 - yProp)
val middleBand = !topBand && xProp <= (1.0 - yProp)
val lowerBand = yProp >= 0.5 && ((xProp <= 0.5 && xProp>= (1.0-yProp)) || (xProp>=0.5 && xProp <= yProp))
Once we have figure out the band we just paint the pixel with the color used for that band: BLUE for the top and lower band, ORANGE for the middle one, and WHITE if the pixel does not belong to any band.
To set the single pixels we use the setRGB function. In this function we receive an array of bytes (rowBuffer). Now, it contains a sequence of pixels, one after the other. For each pixel it contains the red, green, and blue components. We calculate the position of the component of interest for the pixel of interest. For example, for the red component we use rowBuffer.plus(3 * x + 0). Ok, this is where we want to write the value of the red component. However there is an issue because we cannot use a byte, given it is a signed value in Kotlin, so it can hold values between -128 and 127, while we have values between 0 and 255. So we use a short instead. We cast the byte array to a short array and we write the first element. Note that in this way we override the next pixel, so calls to setRGB need to be executed in order. Support for unsigned values is one of the issues that needs to be sorted out.
Consider program arguments
The next step is to consider the program arguments. We expect the user to tell us the size of the logo he or she wants.
val MAX_SIZE = 2000

fun main(args: Array<String>) {
   if (args.size != 2) {
      println("2 arguments expected, while we received ${args.size}")
      return
   }
   val width = args[0].toIntOrNull()
   val height = args[1].toIntOrNull()
   if (width != null && height != null && width in 1..MAX_SIZE && height in 1..MAX_SIZE) {
      draw_logo(width, height, "logo_${width}x$height.png")
   } else {
      println("Please specify positive dimensions equal or lower than $MAX_SIZE")
      return
   }
}
We need to check that two values are provided and that both are valid. We accept only integers between 1 and 2000. If both are valid we move on with the generation. We also use the width and the height to determine the name of the image file.
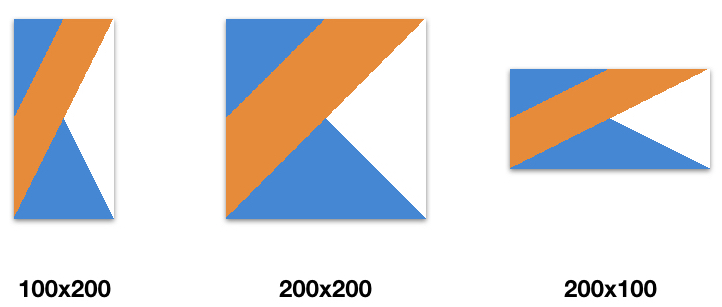
And here there are our logos of all sizes:

Draw a gradient
Our logos look nice but the original is still nicer because it use a gradient, so the different bands are not homogeneous but the color changes as we move from across the band. Let’s try to replicate that.
We need first to add a bunch of elements:
data class Point(val x: Float, val y: Float) {
   fun distance(other: Point) = sqrt(pow((x - other.x).toDouble(), 2.0) + pow((y - other.y).toDouble(), 2.0))
}

data class ColorSource(val point: Point, val color: Color)

class Band(val colorSources: List<ColorSource>) {
   fun color(point: Point) : Color {
      val invDistances = colorSources.map { 1.0f/it.point.distance(point)}
      val sumInvDistances = invDistances.sum()
      var r : Double = 0.0
      var g : Double = 0.0
      var b : Double = 0.0
      colorSources.forEachIndexed { i, colorSource ->
         r += colorSource.color.r * (invDistances[i]/sumInvDistances)
         g += colorSource.color.g * (invDistances[i]/sumInvDistances)
         b += colorSource.color.b * (invDistances[i]/sumInvDistances)
      }
      return Color(r.toInt(), g.toInt(), b.toInt())
   }
}

val TOP_BAND = Band(listOf(
      ColorSource(Point(0.0f, 0.0f), Color(24, 141, 215)),
      ColorSource(Point(0.5f, 0.0f), Color(128, 110, 227)),
      ColorSource(Point(0.0f, 0.5f), Color(0, 149, 213))))

val MIDDLE_BAND = Band(listOf(
      ColorSource(Point(0.5f, 0.0f), Color(248, 137, 9)),
      ColorSource(Point(1.0f, 0.0f), Color(248, 137, 9)),
      ColorSource(Point(0.0f, 0.5f), Color(215, 103, 128)),
      ColorSource(Point(0.0f, 1.0f), Color(199, 87, 188))))

val LOWER_BAND = Band(listOf(
      ColorSource(Point(0.5f, 0.5f), Color(128, 110, 227)),
      ColorSource(Point(0.0f, 1.0f), Color(0, 149, 213)),
      ColorSource(Point(1.0f, 1.0f), Color(128, 110, 227))))
And then to modify how we calculate the color in the inner loop of our draw_logo function.
...
val band = when {
   topBand -> TOP_BAND
   middleBand -> MIDDLE_BAND
   lowerBand -> LOWER_BAND
   else -> null
}
val color = band?.color(Point(xProp, yProp)) ?: WHITE
setRGB(rowBuffer, y, x, color)
...
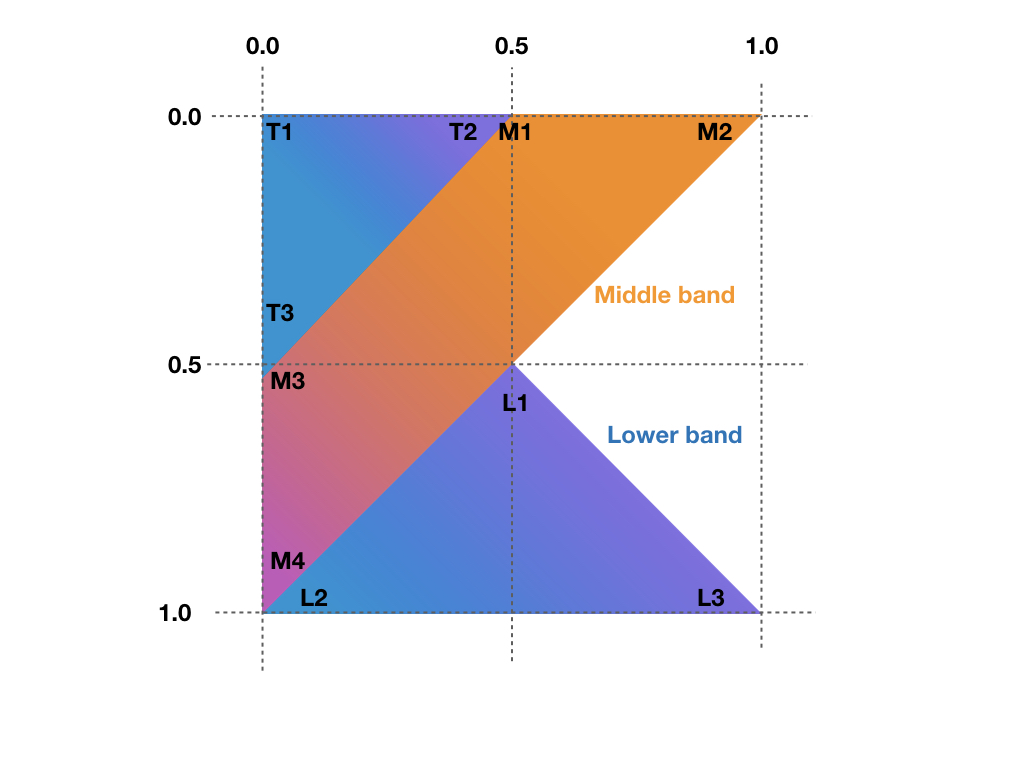
What we are doing here?
For each band we write down the colors of the extremes. You can see the extremes in this picture:

And these are their values:
val TOP_BAND = Band(listOf(
      ColorSource(Point(0.0f, 0.0f), Color(24, 141, 215)),   // T1
      ColorSource(Point(0.5f, 0.0f), Color(128, 110, 227)),  // T2
      ColorSource(Point(0.0f, 0.5f), Color(0, 149, 213))))   // T3

val MIDDLE_BAND = Band(listOf(
      ColorSource(Point(0.5f, 0.0f), Color(248, 137, 9)),    // M1
      ColorSource(Point(1.0f, 0.0f), Color(248, 137, 9)),    // M2
      ColorSource(Point(0.0f, 0.5f), Color(215, 103, 128)),  // M3
      ColorSource(Point(0.0f, 1.0f), Color(199, 87, 188))))  // M4

val LOWER_BAND = Band(listOf(
      ColorSource(Point(0.5f, 0.5f), Color(128, 110, 227)),  // L1
      ColorSource(Point(0.0f, 1.0f), Color(0, 149, 213)),    // L2
      ColorSource(Point(1.0f, 1.0f), Color(128, 110, 227)))) // L3
For each pixel we want to calculate the color depending on how close it is to one of the extremes. In practice we calculate the closeness as the inverse of the distance between each two points. For each pixel we calculate this inverse distance to all the extremes and the sum. Then we calculate the color as the pixel as a proportion considering the closeness and the color of each extreme. This is what we do in Band.color.
And this is what we get:

It is still not as cool as the original one but we are getting closer.
Building everything manually
In this article we have seen how to use the gradle plugin to compile things. However if you prefer to not use it you can also do everything without.
Build the native compiler locally
You may want to compile the native compiler yourself.
To do this you should first clone the repository:
git clone https://github.com/JetBrains/kotlin-native.git
Then you could build it with these two commands:
./gradlew dependencies:update
./gradlew dist
And here you go, now you have the bleeding edge version of the compiler to play with!
Build library manually
Kotlin native is experimenting with its own format for libraries. If you want you can generate a library by running this command:
cinterop -def src/main/c_interop/png.def -copt "$CFLAGS" -target macbook -o build/c_interop/png
Use the compiler manually
If you want to invoke the compiler manually this is how you can do that. Note that here we are using the library we compiled at the previous step:
konanc $COMPILER_ARGS -target macbook src/main/kotlin/logogen.kt -library build/c_interop/png -linkerOpts "-L/usr/local/lib -lpng" -o build/bin/logogen
Summary
Is Kotlin becoming the new solution for “write it once, run everywhere?”
This is a possibility, I think. There is code we need to execute on different platforms. I do not think we will get applications that run on different platforms like the web, iOS and Android because the interactions are different and the user expectations are different. However we need and will probably get common business logic, common libraries. Kotlin seems an interesting language to deliver that.
That said it is possible to build something today, with the Kotlin native compiler as it is but there is a big roadblock: the editor support.
We would like to thank Mario Zechner for his comments which helped improving the article.


I had trouble getting the sample code here to build, due to issues with type inference and generic parameters. The following changes to the setRGB() method fixed my problem:
fun setRGB(rowBuffer: CPointer, y: Int, x: Int, color: Color) {
rowBuffer.plus(3 * x + 0)!!.reinterpret()[0] = color.r.toByte()
rowBuffer.plus(3 * x + 1)!!.reinterpret()[0] = color.g.toByte()
rowBuffer.plus(3 * x + 2)!!.reinterpret()[0] = color.b.toByte()
}
Oops, looks like I pasted in the original instead of the fixed code.
fun setRGB(rowBuffer: CPointer, y: Int, x: Int, color: Color) {
rowBuffer.plus(3 * x + 0)!!.reinterpret()[0] = color.r.toByte()
rowBuffer.plus(3 * x + 1)!!.reinterpret()[0] = color.g.toByte()
rowBuffer.plus(3 * x + 2)!!.reinterpret()[0] = color.b.toByte()
}
Oh no, the issue is that generic arguments are getting stripped from my comments due to the corner brackets. I suspect that happened to the original post as well.
Yes, this is exactly what happened. Thank you for pointing it out. I should have fixed it now.
I am getting this after I run the command: [ cinterop -def src/main/c_interop/png.def -copt “$CFLAGS” -target macbook -o build/c_interop/png ]
error:
cat: /Users/manojn/IdeaProjects/kotlin-native/tools/env_blacklist: No such file or directory
Error: Could not find or load main class org.jetbrains.kotlin.cli.utilities.MainKt
Caused by: java.lang.ClassNotFoundException: org.jetbrains.kotlin.cli.utilities.MainKt
I have done everything as mentioned till here. Also built the compiler successfully.
Thank you.